
Hey folks! As a marine and shipyard electrician, I’ve dealt with my fair share of generators—especially portable single-phase ones used for backup power on boats, job sites, or home emergencies. Single-phase generators are common (120V or 240V output), but when they act up, it can be frustrating. Recently, I troubleshot one at work that wouldn’t produce power, and it reminded me how systematic checking saves time.
This guide is a straightforward, step-by-step approach to common issues: no start, runs but no power, low voltage, surging, or overheating. Always prioritize safety: Unplug loads, turn off fuel, wear gloves/PPE, and consult your manual (models vary!).
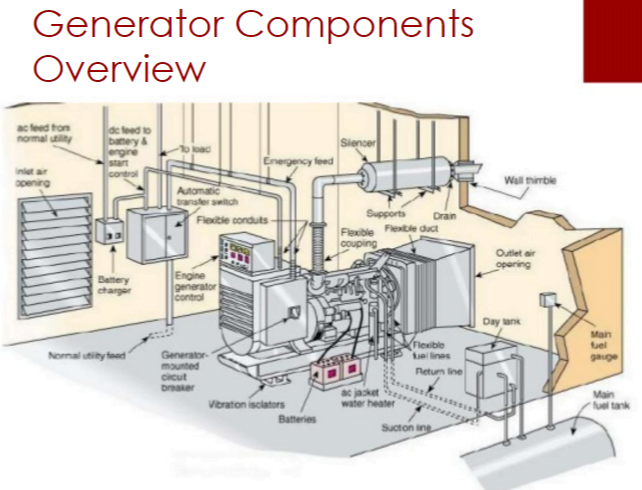
First: Understand the Basic Components
Knowing the parts helps troubleshooting. Here’s a labeled diagram of a typical portable single-phase generator:


(Key parts: Engine, alternator, fuel system, AVR (Automatic Voltage Regulator), outlets, circuit breakers.)
Common Problems and Step-by-Step Troubleshooting
Follow this order: Start with the simplest (and most common) fixes.
- Basic Safety and Visual Checks
- Ensure the generator is on a flat surface, cooled down, and fuel valve is open.
- Check oil level (low oil sensor shuts it down on many models).
- Inspect for obvious damage: Loose wires, leaks, or debris.
- Reset circuit breakers or GFCI outlets if tripped.
- Problem: Generator Won’t Start
- Fuel Issues (80% of no-starts!): Old/stale fuel? Water in tank? Clogged filter?
- Drain tank/carburetor, add fresh fuel with stabilizer.
- Clean or replace fuel filter.
- Fuel Issues (80% of no-starts!): Old/stale fuel? Water in tank? Clogged filter?
Fuel system diagram showing key components and maintenance
(Fuel system diagram—check lines, filter, and carb bowl for gunk.)
- Spark Issues: Pull spark plug, inspect, and test for spark.
- Good vs. bad plug:
Spark plug condition indicates engine health issues
(Clean, gap (usually 0.028-0.031″), or replace. Ground plug to engine and pull cord—look for blue spark.)
- Choke on? Air filter clean? Battery charged (if electric start)?
- Problem: Runs But No Power Output This is classic—engine fine, but no electricity at outlets.
- Test Outlets: Use a multimeter set to AC volts.


(Probe the outlets—should read ~120V or 240V at idle/no load. No voltage? Proceed.)
- Check brushes (if brushed model): Worn or stuck?
- AVR Failure: The AVR regulates voltage—common culprit for no/low output.

(Test or replace—many cheap generics available.)
- Flash the Field: Lost residual magnetism? Short the brushes momentarily with 12V battery while running (careful—sparks!).
- Capacitor (on capacitor-excited models): Test with multimeter.
- Problem: Low Voltage, Surging, or Unstable Power
- Engine RPM low? Adjust governor/throttle.
- Overloaded? Remove loads and test.
- Dirty carburetor causing uneven run.
- Faulty AVR again.
- Overheating or Shutting Down
- Cooling fins clean? Proper ventilation?
- Low oil or overload.
Quick Troubleshooting Flowchart Reference
Many guides use flowcharts—here are examples:


(Start from “no power” and follow branches.)
Final Tips
- Always work no-load first.
- Use quality tools: Multimeter, spark tester.
- If beyond basics (e.g., windings burned), call a pro—rewinding alternators isn’t DIY-friendly.
- Maintenance prevents issues: Fresh fuel, oil changes, run monthly.
In my case, it was a bad AVR—$20 part and 30 minutes fixed it! Hope this helps you get your generator humming again. Share your troubleshooting stories in the comments—I learn from you too! ⚡🛠️
Stay safe and powered up!
Detailed AVR Replacement Guide: Fixing Your Single-Phase Generator’s Voltage Regulator
Hey everyone! As a marine and shipyard electrician, I’ve replaced my share of Automatic Voltage Regulators (AVRs) in single-phase portable generators—these little boards keep your output voltage steady, but they can fail from overuse, surges, or age. If your genny runs but outputs no/low voltage, the AVR is often the culprit. Recently, I swapped one on a backup unit at work, and it was straightforward with the right steps.
This detailed guide covers replacing an AVR in a typical single-phase portable generator (like Briggs, WEN, or generics). Models vary, so always consult your owner’s manual for specifics—wiring can differ! If you’re unsure, call a pro. We’ll include safety, tools, steps, wiring, testing, and pitfalls. Let’s get your power stable again! ⚡🛠️
Safety Precautions First
- Turn off the generator and let it cool completely to avoid burns or shocks.
- Disconnect all loads and extension cords—no power should be flowing.
- Set the fuel valve to OFF to prevent leaks or accidental starts.
- Work in a well-ventilated area (no fumes buildup).
- Wear PPE: Gloves, safety glasses, and non-conductive shoes.
- If your generator has a battery (electric start), disconnect it.
- Never bypass safety features or run tests under load initially.
Tools and Materials Needed
- Screwdriver set (Phillips and flathead for covers/screws).
- Multimeter (for voltage testing).
- Wire labels or tape (to mark connections).
- Replacement AVR (match your model—e.g., via part number; generics work but check compatibility).
- Optional: Pliers for stubborn connectors, flashlight for visibility.
Step-by-Step Replacement Process
- Prepare and Locate the AVR Shut down the generator as per safety steps. Remove the end cover or access panel on the generator head (alternator end)—usually secured by screws or bolts. The AVR is a small circuit board, often rectangular or moon-shaped, mounted inside near the brushes or control panel. In many models (like WEN), it’s on the bottom-left of the head.
Generator Excitation Control Systems and Methods – Generator Source
(Diagram showing typical AVR location in a generator head—helps spot it quickly.)
- Inspect Related Components Before pulling the AVR, check carbon brushes (if your model has them)—they’re often nearby and can cause similar issues if worn. Detach brush holder screws and inspect for corrosion or breakage. Clean or replace if needed, as this might fix the problem without AVR swap.
- Disconnect Wires and Remove Old AVR Note or photo the wiring—AVRs have 4-6 wires (e.g., sensing, excitation, power). Label each (e.g., “red to terminal 1”). Gently disconnect using pliers if quick-connectors are stuck. Unscrew mounting bolts/screws holding the AVR. Lift it out carefully—no force!
AVR retrofit wiring | DIY Home Improvement Forum
(Wiring diagram for AVR retrofit—shows common connections like positive/negative and sensing wires.)
- Install the New AVR Mount the new AVR in the same spot using the screws. Reconnect wires exactly as before—refer to your manual’s diagram or the new AVR’s labeling. For quick-connectors, ensure they snap fully (click sound). Double-check for loose strands.

Synchronous Generator Basics, Simple Guide to rewire your HEAD …
(Synchronous generator wiring example—useful for understanding 120/240V setups tied to AVR.)
- Reassemble and Initial Check Replace the access cover securely. Reconnect battery if applicable. Turn fuel valve ON but don’t start yet—visually inspect for missed wires or tools left inside.
Wiring Tips
- Common wires: Two for brushes (excitation), two for output sensing (voltage feedback), and sometimes power/ground.
- Use the schematic: Match colors or terminals (e.g., F+ and F- for field).
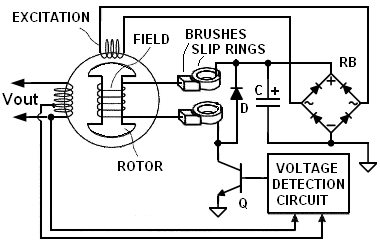
Schematic diagram of an AVR system | Download Scientific Diagram
(Schematic of an AVR system—illustrates how it regulates voltage in the generator.)
- If using a generic AVR, confirm pinouts—mismatches cause no output or damage.
- For single-phase: Ensure it’s set for 120V/240V as needed; some have jumpers.
Testing After Replacement
- Start the generator (no load) and let it warm up 1-2 minutes.
- Use multimeter on AC volts: Probe outlets—should read stable ~120V (or 240V split-phase). Fluctuations? Recheck wiring.
- Add a small load (e.g., light bulb) and retest—voltage should hold.
- Monitor for 5-10 minutes: No overheating, surging, or shutdowns.
- If no power: “Flash the field” (apply 12V briefly to brushes while running) or check fuses.
- Still issues? AVR might not be the problem—test alternator windings with ohmmeter.
Common Pitfalls and Mistakes to Avoid
- Wrong AVR: Generics must match specs (e.g., amps, voltage)—check reviews or OEM cross-reference.
- Poor Connections: Loose wires cause arcing/damage—ensure snaps/terminals are tight.
- Skipping Brushes: Worn brushes mimic AVR failure; always inspect.
- No Manual Reference: Wiring varies by brand (e.g., Briggs vs. Honda)—don’t assume.
- Testing Under Load Too Soon: Risk shorts or inaccurate reads.
- Forgetting Labels: Reversed wires can fry the new AVR instantly.
In my recent swap, a mismatched connector was the hiccup—snapped it right, and voltage was rock-solid at 118V. Total time: 30-45 minutes. If your genny’s older, consider upgrading to a better AVR for reliability.
Got AVR horror stories or tips? Comment below—I love swapping knowledge! Stay powered, folks.